
Welcome to the "Zoo Bus" page where
we have attempted to provide you with the information needed to build
your own "Zoo Bus". If after reading this material you still have
questions, please let us know and we will be happy to try and answer
them for you.
It would be beneficial to have access to various
tradesman especially an electrician and a welder. The rest of the
construction is relatively simple and straight forward.
"The Zoo" Bus, View looking to rear of Bus
Showing Puppet Stage and TV.

Construction of the Walls
and Floor
Obviously the first step in renovating the Zoo Bus
was to
remove all the original seats from the bus. The holes left in the
floor once the seats were removed, were filled in using caulking. The
metal stripping running down the center of the bus was also removed.
The entire floor of the bus, starting behind the driver's seat, was
insulated using 2' x 8' blue insulation. The sheets of insulation
were placed down with caulking cement. Once the floor was covered,
5/8" tongue and groove plywood was placed down. The tongue and
groove ensures a tighter floor.
Panel adhesive was used to adhere to both the Styrofoam and the
plywood instead of screws as screws have a tendency to loosen and cause
annoying squeaks.
Depending on the type of climate you will be operating in, you may
want to consider
insulating the interior walls with one inch white Styrofoam. Again
use glue not screws. Covering the Styrofoam, use 1/8 inch hard board
panelling, again glued on. Indoor/Outdoor carpeting was chosen to cover
the wall paneling and the floor as it allows for easier cleaning and
more durability. Keep in mind that children love to pick at things. The
more you secure and cover the less distractions you will have to contend
with.
As the wheel wells tend to protrude into the passenger area, we
decided to build a
platform to cover the wheel wells. This was to prevent the children
from sliding on the wheel wells as well as creating a distinct area
between the children and the puppet stage area. Another advantage of
doing this was to allow an electric heater with a fan to be installed
under the platform to provide additional heating for the bus when the
bus engine is not running. As you can see by the above photograph, the
area where the children sit is kept clear and uncluttered. This allows
the program to be operated with a minimum of distraction and also adds
an element of safety.
As you may notice in the above photo, the windows remain uncovered.
This was done firstly to allow people on the outside of the bus, i.e.
parents, to observe the program in action to conserve extra space for
the children inside. Secondly it allows the program to be viewed by the
general public to help prevent any possible misunderstandings.
The windows behind the puppet stage area were removed and replaced
with
metal plates. We then placed blue insulation panels over the back
and side walls behind the puppet stage. This provides greater security
in the rear of the bus and helps keep it warmer during the winter
months. An electrical outlet was also placed behind the puppet stage to
plug in a small ceramic heater.
"The Zoo" Bus, View looking to front of Bus
Showing Sound Booth

Construction of the Walls
and Divider
In order to keep the children from being distracted
during "The Zoo" program by people entering the front of the bus, we
decided to place a dividing wall near the front door. In order to
maximize space to allow more children into the main area of the bus, the
dividing wall was installed directly behind the main door.
Steel studs were used instead of wood for framing all the walls in
the bus. The reason for using steel studs is that they are easily cut
and screwed into place and they do not warp. All the screws used to
fasten the studs to window pillars, bus floor and the ceiling were the
self drilling and tapping type screws. We used 1/2 inch plywood attached
with paneling adhesive and drywall screws to cover the walls. As a
safety precaution it would probably be a good idea to round out the
corners of the walls with a sander to prevent a child from being injured
by running into the sharp edge.
"The Zoo" Bus, View looking inside the
television compartment.

Construction of Compartment
and Securing of TV.
The television/VCR in "The Zoo" bus is used to show
various Christian videos and cartoons that go with the weekly theme. It
is not set up in "The Zoo" bus to pick up regular TV. channels. Since
the bus is obviously mobile and not as smooth riding as a smaller
passenger vehicle, it is necessary to secure the television against
movement while the bus is in transit.
The TV. compartment has a thick Plexiglas screen in the front to
protect the television from unwanted tampering by the children and the
chance of something being thrown at the TV. set. Again the construction
is steel studding and plywood. Again we recommend removing the window
from this area of the bus for security reasons. The TV. is kept in place
by sliding a piece of plywood along a wooden track behind the unit and a
nylon tie down strap is placed over top of the television and secured by
two eye bolts to keep the TV. from shifting.
The area below the television could be used for storage of puppets
etc. In the case of our Zoo bus, we placed the TV. compartment directly
over the generator box. As a result we had to place sound deadening
insulation between the generator box and the compartment to reduce the
noise from the generator. Electrical interference did not seem to be a
problem.
"The Zoo" Bus, View of Switches and Mike
Plugs at rear of puppet stage area.
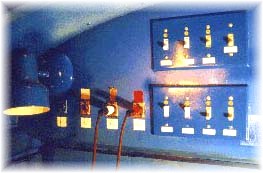
"The Zoo" Bus, View of electrical panel
behind TV. compartment.
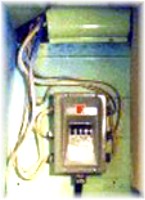
Note
the wires running from the electrical panel into the conduit.
Electrical
All electrical fixtures are standard household
items with the exception of the lights in the main area. The fixtures we
chose are made of exterior marine grade plastic to prevent tampering and
breakage.
Ideally an electrician would be a definite asset in this area of
construction. All wires, cables etc. must be run in an
enclosed conduit. Some buses have a conduit channel running along
the top of the windows that are held on with screws. This is an
excellent place to run the wires from the sound booth at the front of
the bus, to the puppet stage area and electrical panel at the rear.
Exterior lights were placed above the windows on the outside of the
bus to provide lighting for those standing outside the bus in the
evenings. We placed two on each side of the bus and one at the rear for
safety and security.
Another idea that we have thought of but as yet have not tried is to
install a backup DC power source. This would be great to help provide
emergency lighting if your generator should die on you some evening.
This has happened to us on several occasions.
It is a good idea to have dual controls for lighting. One location in
the sound booth and one behind the puppet stage.
Do Not run wires or cables where they can be pulled,
tripped over, or handled in any way by the children. A little bit of
time and effort in this area will go a long way in preventing
unnecessary accidents.
In colder climates it is a really good idea to keep the sound booth
and television compartment warm to prevent condensation on the
electronic components which could result in failure. We chose to use
electric interior car heaters for this application.
Another step we took to prevent possible electrical damage to the
equipment was to connect the TV. and sound equipment to an Uninterruptible
Power Supply.
"The Zoo" Bus, View showing inside of Sound
Booth located behind driver's seat.

Construction of Sound Booth
In keeping with our theme of maximizing space for
the children to be in the bus, the sound booth was kept as small as
possible while still remaining functional. It is a good idea for
security reasons to remove the window in the sound booth area and
replace it with a metal plate. The sound booth has a Plexiglas window
with a blind so that the person operating the sound gear can monitor
what is taking place during the program. A small floor vent was placed
at the top of the door on the sound booth for ventilation. The sound
booth was also equipped with dimmer switches for the lighting in the
main area of the bus and two standard 110 volt outlets to plug in the
sound equipment.
Power Supply
For the first ten years of operating the "Street Connection"
bus we used a 4500 watt
gasoline generator to supply AC power for the bus. We went through
several of these generators and found them to be somewhat unreliable and
high maintenance for the type of work that we do.We decided to use a
2500 watt power inverter instead of the generator and have found that to
be a much better solution for our power needs. We have two 8D
tractor batteries that we placed in the generator compartment. We
use a heavy duty battery charger to charge the batteries. The
power inverter converts the DC power from the batteries to 110 AC power
for the bus. One of the big advantages besides the reliability
factor is that there is no longer any noise. Just be sure to check
the fluid levels in the battery on a regular basis.


|
